
Forum Replies Created
-
AuthorPosts
-
in reply to: module temporisateur no SKU :200350 #54058
Bonjour Gilles,
Vous pouvez vous référer au schéma de câblage dans le manuel. https://images-na.ssl-images-amazon.com/images/I/91z+BlySwmL.pdf
Si vous avez d’autres questions, veuillez nous en informer.Meilleures salutations,
DROK
————————
Hello Gilles,
You can refer to the wiring diagram in manual. https://images-na.ssl-images-amazon.com/images/I/91z+BlySwmL.pdf
If there are any more questions, please let us know.
Best regards,
DROK
in reply to: manuals for your product #53580Hello Rod Mattos,
We only have one manual, did you get this one? https://images-na.ssl-images-amazon.com/images/I/C1zIm9IgBsS.pdf
Best regards.
in reply to: manuals for your product #53492Hello Rod Mattos,
There are not items match this number B0855P49JV. Would you like to tell us the ASIN number or product link?
Best regards.
-
This reply was modified 5 years, 3 months ago by
 Drok.
Drok.
in reply to: DKP6012 Manual #53404Hello,
Here is manual for #200310
https://www.droking.com/cs/wp-content/uploads/2020/11/200310.pdf
Best regards.
in reply to: Drok DKP6012 Overheating #53396Hello,
With large voltage difference, power loss will also increase. If possible, it is better to lower votlage diffrerence.
Best regards.
Hello David F,
Thanks a lot for your suggestion.
But it seems you mistake the OUT” arrow . When the arrow point to the right, that is discharging status, AH is decreasing.
On the contrary, AH increases when arrow point to the left.
Best regards,
DROK
in reply to: Drok DKP6012 Overheating #53297Hello Fexa,
We are sorry factory doesn’t allow to show schematic. AnD The starting current can’t be adjusted by user.
Is there large voltage difference between input and output?
Best regards,
DROK
Hello Mark Jose,
Please refer to below current calibration. If there is no large error, it is not recommend to calibrate meter.
Charging and discharging current calibration methods are the same.
1. Hook up the measuring module with power supply and load according to the charging/ discharging wiring diagram.
2. Set the power supply as over 12V, then hold on the OK button and power the meter simultaneously. release button after 3 seconds. It will come to parameter setting;
3. Please move yellow cursor to “Mode” and short press OK button, then move the yellow cursor to “+4.A”(It is “-4A” in discharging mode). In that case, please make sure the actual load current is over 1.00A. Next, please press up or down button to adjust the current reading of meter until it is the same as actual load current. After that, press OK, andmove yellow cursor to ”Save” and save the setting.Best regards,
DROK
in reply to: mount screw size #52883Hello BobbyFontaine,
It is 3mm screw.
Best regards.
Hello Ammar,
We are sorry it is hard to combine this feature with 200304.
Best regards,
DROK
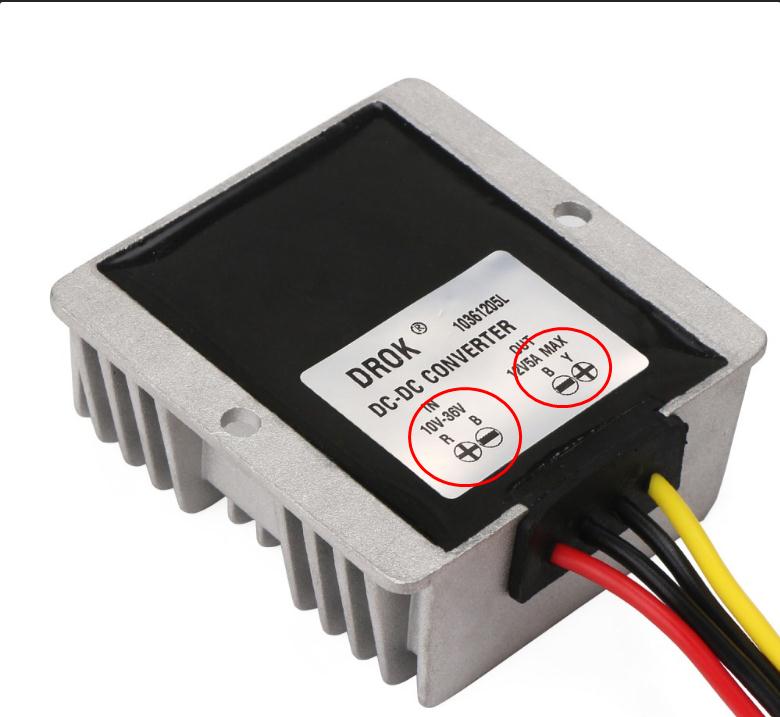
in reply to: manuals for your product #52812Hello Jay Lyons,
As shown below, the red wire and black wire are connected to power supply, the yellow wire and the other black wire are connected to load.
For any more questions, please let us know.
Best regards.
 in reply to: Drok 40 mounting brackets #52803
Hello johannes duvenhage,
We are sorry we are not which is the best source. You may try to find that online.
Any more questions, please let us know.
Best regards.
in reply to: Battery charging with DC-DC buck converter #52802Hello Robin,
According to your description, please check if it is this item, #200324 https://www.amazon.com/dp/B0744BT79M/ref=as_li_tl?tag=proeng-20
For charging battery, please connect diode to output terminal in case current flow back to converter.
Best regards,
DROK
in reply to: VAC8010F-80V non-functioning KWH display #52801Hello Mohamed,
Are you taling about this item? https://www.droking.com/Digital-Meter-Multifunction-Panel-Meter-DC-6V-80V-300A-999-KW-LCD-Display-Tester-Monitor-Meter-Multimeter-Thermometer
Would you please tell us your setting parameters?
Best regards.
-
This reply was modified 5 years, 3 months ago by
-
AuthorPosts