
Forum Replies Created
-
AuthorPosts
-
in reply to: Usb tester operating current #36193
Hello Muhammad Asif,
Thanks for writing in.
Do you mean current draw of meter? It is less than 20mA.
Best regards.
in reply to: JS-C33 Programming submenus 2 & 3 #36191Hello Ramon L Collazo,
Thanks for writing in.
As per your inforamtion, it shoud be 2001710003
Submenu 2 is for delayed shutdown. If you set delayed time, meter will turn off after that time.
If your 12v battery is leacd-acid type, please set P12v in submenu 1.
Submenu 3 is custom setting. Some battery specifications are not available in Submenu 1, then you can choose submenu 3.
You just need to set minimum voltage and maximum voltage for your battery. Hope that can help you.
Best regards
in reply to: Current Transformer (CT) #36186Hello Edward Van Hook,
Thanks for your message.
As per your description, it should be 200199. Meter can only work with the original CT, which is high precision one. We are sorry other kind of CT is not suitable.
Any more questions, please kindly contact us.
Best regards.
in reply to: SKU: 200310 #36175This reply has been marked as private.in reply to: SKU: 200310 #36171Hello Pedro,
From the video, we can see display is not statble. How large is the input voltage? If without any load, how is it?
And is it the first use?
Best regards.
in reply to: manuals for your product #36170Hello Amagasakii,
Thanks for writing in.
We have pdf manual in Amazon page. Here is the link, https://images-na.ssl-images-amazon.com/images/I/B10A-G24SrS.pdf
Any more questins, please kindly contact us.
Best regards.
in reply to: DROK 180050 voltage reegulator #36163Hello RJC,
Could you please tell us more details about your problem? It is easy to adjust voltage. You can turn it clockwise or anti-clockwise.
Here is simple manual, https://www.droking.com/RJCcs/wp-content/uploads/2017/01/DATASHEET_180050.pdf
Best regards.
Hello Evan Geiser,
VA is unit of apparent power. Watt is unit of active power. In direct-current circuit,apparent power is almost the same as active power, so you can just take it as 0.5w.
Best regards.
Hello Joel,
If reading is not correct after changing, you need to calibrate it according to below steps.
DC adjustable power supply, multimeter, load
Voltage calibrateion:
1. Hook up the meter with power supply and load.
2. Keep pressing ‘’OK” button and power on meter. After power on, please wait for 3 seconds and then release button. It will come to setting interface.
3. Please move yellow cursor to “Mode” and short press OK button, then move the yellow cursor to “10.V” and increase the voltage of adjustable power supply to 12V. Then press up or down button to adjust measured voltage of meter until it is the same as actual output voltage.
4. Next, please press “OK” button to move the cursor to “40.V”; increase the voltage of power supply, this voltage value can be any one between 32V-40V; Then press up or down button to adjust measured voltage of meter until it is the same as actual power supply voltage.
5. Please short press “OK” button again to move to”10.V”, and repeat the above two calibration for 12V and 40V. When the error between measured value and actual value is small, the calibration is finished. Then press “OK” to move the cursor to “Save” to save the setting; at last, power off and then power on again.Charging / discharging current calibration:
1. Hook up the measuring module with power supply and load according to the charging/ discharging wiring diagram.
2. Set the power supply as over 12V, then hold on the OK button and power the meter simultaneously. Hold on OK for 3 seconds and then release. It will come to parameter setting;
3. Please move yellow cursor to “Mode” and short press OK button, then move the yellow cursor to “+4.A”(It is “-4A” in discharging mode). In that case, please make sure the actual load current is over 1.00A. Next, please press up or down button to adjust the current value of meter until it is the same as actual load current. After that, press OK, move yellow cursor to ”Save” and save the calibration.1.Connect the meter, power supply and load according to the charging wiring diagram.
2. Hold the “OK” button for three seconds to go to the parameter setting;3: Move yellow cursor to “Mode” position, disconnect the load firstly or make sure the load current is 0.00A; then click the “OK” button to adjust it to “0.0A”, and then short press the ↓button, the current display value will be returned to zero.
3: Then click OK to move the Yellow cursor to Save, and click OK to move the Yellow cursor to Mode.
Any more questions, please kindly contact us.
Best regards.
in reply to: manuals for your product #36144Hello David Bowling,
As per your information, we think it should be this item 200150.
Here is pdf manual, https://images-na.ssl-images-amazon.com/images/I/81dpxpKSsFL.pdf
For any more questions, please kindly contact us.
Best regards.
Hello Marc,
Thanks for writing in.
Is this item? 200219?
Below is the calibration steps. Did you operate it like that?
A DC adjustable power supply, multimeter, load
Charging / discharging current calibration:
1. Hook it up according to the charging/ discharging wiring diagram.
2. Set the power supply as above 12V, then hold the OK button and power the meter simultaneously. Hold on OK for 3 seconds and then release. It will come to parameter setting;
3. Please move yellow cursor to “Mode” and short press OK button, then move the yellow cursor to “+4.A”(It is “-4A” in discharging mode). In that case, please make sure the actual load current is over 1.00A. Next, please press up or down button to adjust the current value of meter until it is the same as actual load current. After that, press OK, move yellow cursor to ”Save” and save the calibration.Best regards.
in reply to: Sku 200199. Only getting voltage reading #36130Hello Anthony Link,
To check what problem it is, would you like to take some images to show the whole connection? In that way, we can check it more carefully. And did you use the current transformer come wit it?
You can upload pictures here or send them to service@droking.com.
Best regards.
in reply to: Programmable Cycle Relay Module 200088 Timer Issue #36128Hello Justin,
Thanks for your information.
After checking, it should be normal. The problem is caused by NX setting. Please refer to below instruction.
For mode 7, 8, 17, and 18, NX means the number of cycle. But for 1-6 and 11-16, it is a unit of time.
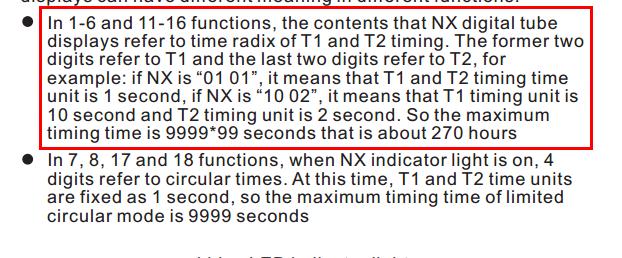
For example, you want to set T1 as 10 seconds. If NX is set as 1 second, you can set T1 as 10.
However, if NX is 2, T1 should be 5. The LED will flash 5 times instead of 10. It seems the frequency is different, actually time length is the same. You can check the time with other device. For any questions, please kindly contact us.
Best regards.
-
This reply was modified 6 years, 9 months ago by
 Drok.
Drok.
in reply to: Programmable Cycle Relay Module 200088 Timer Issue #36117Hello Justin,
Thanks for writing in.
Is it convenient for you to show how it is by video? In that way, we can check it more carefuly.
You can share us video link or send it to service@droking.com.
Best regards.
in reply to: 200310 Buck Converter with AC input. #36114Hello Shawn,
We don’t have AC version for 200310. Any more questions, please kindly contact us.
Best regards.
-
This reply was modified 6 years, 9 months ago by
-
AuthorPosts